
No warm-up? Lesson needs some “umph”? Or maybe you just need to kill some time? No worries, I’ve got you covered with these awesome Italian class activities!
These are my 10 most awesome NO PREP warm-ups that I rely on all the time! They have been used over and over with grades 8-12, university students, and adults too.
I love starting class with some kind of fun, interactive activity to get students into “Italian-mode”. My warm-up Italian class activities are pretty much always speaking-oriented and if I can get my students moving around the classroom talking to multiple people, even better!
Okay, now that I’m sure you are super excited for some warm-up activity awesomeness, let’s go! 😀
I’m going to start with one of my absolute favourites – what I like to call “The Island of Obstacles“.
The name sounds complicated but it is super easy to organize and play. After the first time you use it, you will be able to throw it in without any effort at all. PLUS, it covers those two warm-up elements that I love: the speaking and the moving around!
WARM-UP #1: ISLAND OF OBSTACLES
LENGTH: 15-20 minutes
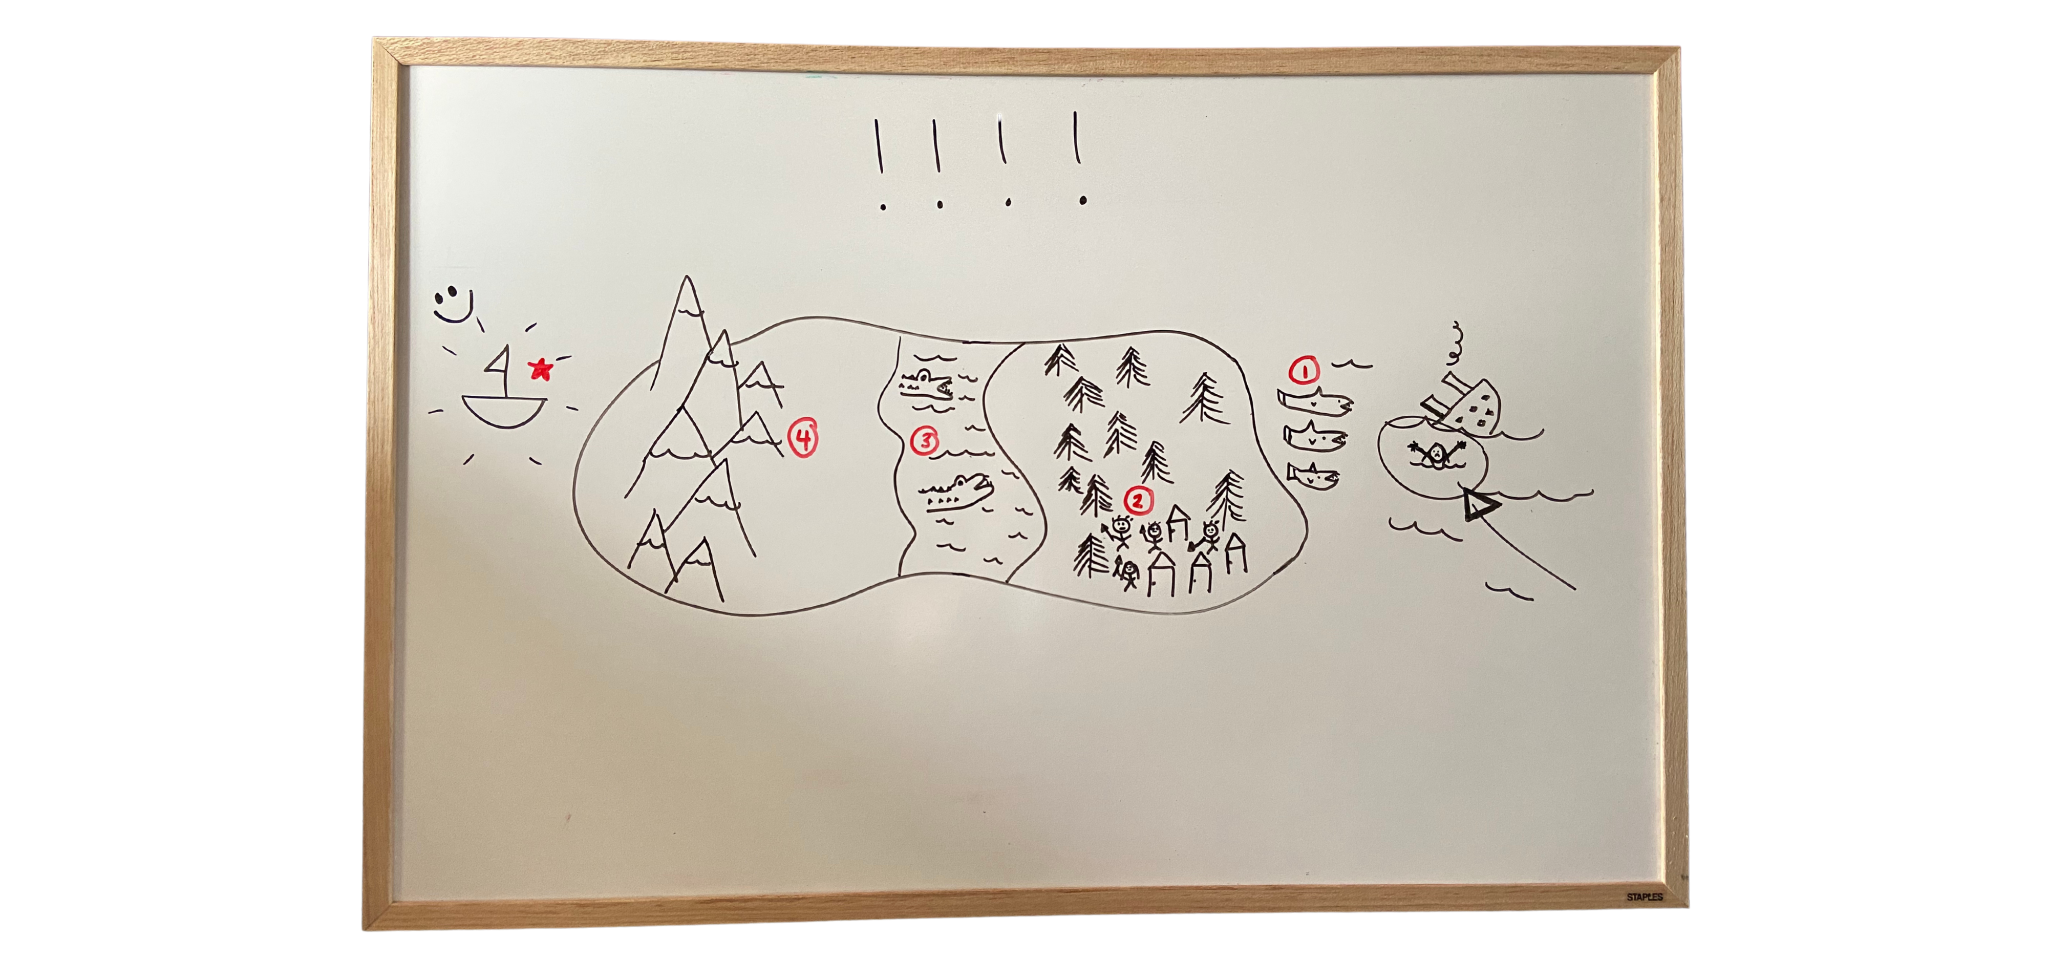
OVERVIEW: You draw a fast map of an island on the board which contains a variety of obstacles. Before students know the point of the game, you tell them to choose only one object from either their bag or around the classroom (within reason, and it cannot be a cell phone). *Another option is to get them to draw an object on a piece of paper for more variety*. The students are then told that they have been shipwrecked on one side of the island and they need to work together as a team to make it to the rescue boat on the opposite side. At the end, they describe how they made it across using their objects and teamwork.
GRAMMAR: Multiple options (the easiest ones are the present and future tenses because they need to talk about their plans and solutions to the problems)
THE DETAILED VERSION
STEP 1: Create Interest, Draw the Map
The first part is creating interest in your class about what kind of activity is going to be happening.
As students are entering the classroom, I like to be quickly drawing the island. I always make sure to include at least 4-5 “difficulties” that the students will encounter on the island.
The students come in and ask questions about what I’m drawing, laugh at the poorly drawn animals, and try to figure out what the activity is. It sets up a great vibe for the beginning of class!
Options for obstacles:
– mountains to pass over / through
– a river to cross with no bridge
– a forest with hungry, wild animals
– cannibals who live on the island
– hungry sharks in the water between the island and the lifeboat
– a windstorm to endure
– whatever other creative things you come up with!
Here’s an example of a map that you could draw that has 1 – sharks, 2 – cannibals, 3 – river with alligators, and 4 – mountains to climb! (Don’t mind the terrible drawing)
STEP 2: Students choose their items
Next, before telling the students what the activity is, ask them to choose ONE item from around the class or from their bags. It CANNOT be a cell phone (they will just try to call for help and skirt around the activity).
**Another variation is give them paper and they can draw one item of their choice. This is lots of fun and gives them more freedom to draw a completely random object!**
STEP 3: Describe the Challenge
Tell students that they have been shipwrecked!!
They have made it alive off the boat but now they are stranded on the island. Their only hope is to work together in small teams to make it to the rescue ship on the other side.
Their task is to convince others why their item is useful and how it can benefit the team in their goal of getting to the rescue boat. Once the team is formed, they must be able to explain together how they are overcoming each of the obstacles.
**The rescue boat can only take groups of 3 people so students must work hard to sell the usefulness of their items!**
Make sure they know that:
– they cannot change their items
– groups are no more than 3 people
– cell phones cannot be used
– at the end of the activity they will be asked to describe how they made it to the rescue boat and how they will use their items
– they are not allowed to swim around the outside of the island to avoid the obstacles
– once you accept a group member you cannot swap them out, even if someone else has a more useful object
– the boat will not come to them if they wait
STEP 4: Let them mingle!
At this stage, let them wander with their items! I give them approximately 10 minutes to talk to other students in the class (in Italian) and plead their case. I walk around and give suggestions / help with vocabulary and sentence building.
STEP 5: The Wrap-up
When you see that most students have found a group, give a 1 minute warning and make sure they are thinking about how they will summarize their escape plan.
Once the minute is up, ask groups to share their items, how they used / will use them and what they did / will do to make it off the island.
I love the creativity that comes out during this portion. There are tons of hilarious ideas!
Once a few groups have shared their strategies, we proceed to the next part of the lesson.
WARM-UP #2: THE DRAWING EXCHANGE
If you have been studying prepositions and your students could use a fun little refresher, this activity is great practice!
LENGTH: 10-15 minutes
OVERVIEW: Students draw a simple picture (hidden from their partners) based on a theme that you provide and then explain to their partner how to draw the picture using prepositions of place + the necessary vocabulary.
GRAMMAR: For this one, students need to have some basic knowledge of prepositions and of whatever theme you choose.
THE DETAILED VERSION
STEP 1: The Initial Drawing
Students are each given one piece of paper upon which they will draw their beautiful masterpieces!! (joking lol… basic pictures)
Make sure to give them a basic theme to follow so that they have an idea of what you want them to draw. A few easy themes are:
- things in the kitchen
- a scene of a classroom
- a zoo / farm
- a park
- places in the city
- things in the bedroom
- a scene at a party
Reassure them that it should be a fast, easy drawing so it doesn’t become too elaborate – there is always an artist who finds it difficult to do a less than perfect job!
STEP 2: Find a partner and describe the drawing
After they have finished drawing their pictures, students choose partners and explain to the partner how to draw the beautiful designs they have made on their papers.
Make sure there is no looking! It is so much more fun if they can’t see the initial drawing and really have to listen to the description!
STEP 3: The Reveal
After they are done describing / drawing the location of the objects, students show the papers to each other and they get to see how close they were!
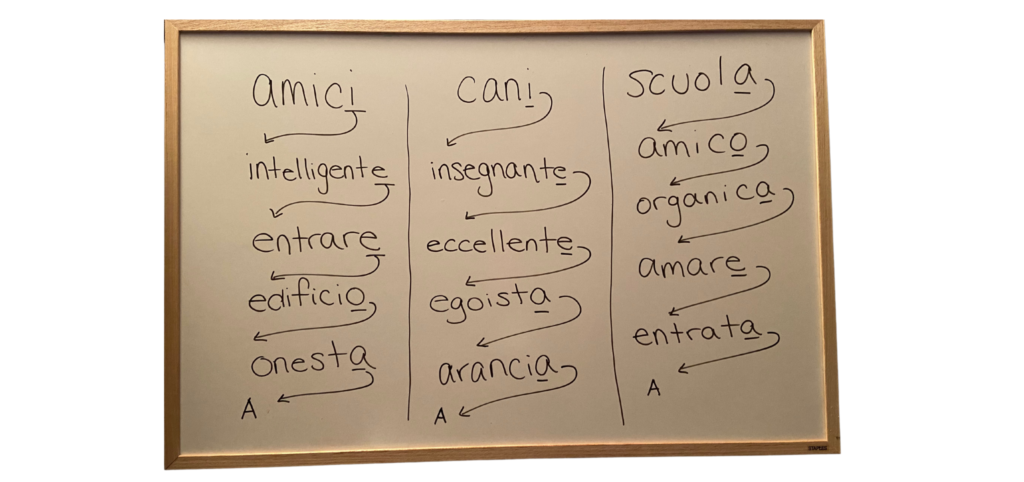
WARM-UP #3: THE LAST LETTER RACE
LENGTH: 10-15 minutes
OVERVIEW: This game builds upon an English game that many of us know from when we were kids! Do you remember the countries / states game where you had to use the last letter of the previous word to start the next word? This is like that… but Italian… and more general… and competitive! Woo! Students have 90 seconds to write down as many words as they can in a team and beat the other teams.
GRAMMAR: None necessary, just a fun vocabulary game!
THE DETAILED VERSION
STEP 1: The Board
Divide the board into 4 sections (for the 4 teams you will make – you can make less sections if you have a smaller class)
STEP 2: Student Teams
Divide your students into teams of 4-5 people and get them to line up one behind the other in front of their section of the board.
**You can do this multiple times so that the whole class gets involved or if you have a small class you might be able to just do multiple rounds with the same teams!
STEP 3: The Game
Give students the same starting word and get the first person in each line to write it down on the board.
All following words MUST start with the last letter of the previous word!
Tell them that they will have 90 seconds to get as many words on the board as they can and beat the other teams.
After a student writes a word, they must go to the back of the line and the next student moves up to write a word. Each student can only write one word at a time.
**I usually say that this can be ANY Italian word if the students are not very strong just so that they have fun and enjoy using Italian! If the students are more advanced, I give them themes (animals, things at school, household objects, sports, etc)
STEP 4: Set the Timer, Watch them go!
This is the fun part where they write and run as quickly as they can to get the most possible words on the board. After the 90 seconds are up, we see which team got the most words and usually a rematch is quickly demanded!
WARM-UP #4: 3 TRUTHS AND A LIE
LENGTH: 10-15 minutes
OVERVIEW: Although this is one that gets mentioned a lot, I think it deserves to be put in here among my top contenders! For this activity, students write 3 true sentences about themselves and 1 lie. Next, in small groups they read the sentences and their classmates need to figure out which one the lie is!
GRAMMAR: None necessary! Basic sentence format is all they need.
THE DETAILED VERSION
STEP 1: The Teacher Intro
I like to start off the class by writing my own example on the board. Students love trying to figure out which one is the lie and it gets them interested in the game from the beginning. PLUS, they have an example on the board that they can copy if they feel stuck!
STEP 2: The Student Task
Students each use a piece of paper to write their own 3 truths and a lie that they will be sharing with their small group.
Make sure that students try to make these sentences unique! Perhaps something interesting that their classmates don’t know about them yet! This is a great chance to create some class camaraderie and give all your students the opportunity to share something awesome about themselves.
STEP 3: The Discussion
At the end of the task, I like to ask the class what they learned! Did they find out something cool about one of their classmates? Something surprising?
*If you are strapped for time you could probably leave this part out, but I like to do it because it provides a bit of closure for the activity and students are happy to share all the fun things they learned about each other! It gives me a chance to learn more cool things about my class too!
WARM-UP #5: PASS THE PENGUIN
Although this title gives the impression that there are lots of fun penguins in this game (which I totally wish there were), really that is just what I call it because we have a lot of penguin stuffies in our house that I use for it! You can use something else and make up your own fun name! 🙂
LENGTH: 10-15 minutes
OVERVIEW: If you have ever played “Pass the Bomb”, this is quite similar! Students are given a theme and a variable time limit. When the timer (monitored by me) begins, the student who is holding the penguin says a word related to the theme and passes the penguin to the next person. This continues as quickly as possible until the timer goes off. At this point, the person still holding a penguin receives an “P”. The student with the least “P”s at the end of all the rounds (as many as you feel like doing!) is the winner!
GRAMMAR: None needed, just pick some themes with common vocabulary words so that they have lots to choose from!
THE DETAILED VERSION
STEP 1: Penguin Distribution and Rules
Divide the class into small groups of 5-6 people and give each group 1 penguin. (You can really use anything that you have available to pass around – whatever’s convenient!)
I bring the penguins into class if I have planned ahead of time to do the game. I also keep a set of squishy balls in the classroom for these games as well in case of emergency!
STEP 2: Game Play
Explain that the goal of the game is to NOT get stuck holding the penguin. Each student must say one word that relates to the given theme and pass the penguin quickly to the next person. When the timer goes off, the person with the penguin receives a “P”.
Set the timer on your phone (watch, computer, anything you have available) for a random time between 30 and 90 seconds.
After the timer is set and you are ready to press go, tell students the theme that they need to be saying the words for (if you tell them too early they start to make lists).
*Make sure that they know NOT to repeat words that other students have said and that they must pass the penguin quickly to avoid being stuck with a “P”!
Do as many rounds as you like! (6-7 rounds is usually a good amount – students get warmed up without it dragging on for too long)
STEP 3: Count the “P”s
After you have finished all the rounds, ask the students as a class how many “P”s they received. Usually, I start by asking about the highest possible number of “P”s and work my way up to the winner!
WARM-UP #6: 90 SECOND CONVO
LENGTH: 10 minutes
OVERVIEW: Students line up in two lines, directly opposite each other. I give them a topic that they are to talk about with their partner (the person opposite them) for a full 90 seconds. After that 90 seconds is up, the line moves down by 2 spots so that each person is lined up with a new partner. And the cycle continues! All you need to do is come up with a new talking point every 90 seconds, and there are endless things to talk about!
GRAMMAR: None needed! I try to use fun, relevant topics that students would be interested in talking about (eg. TikTok videos, the best thing to do in the summer, the worst homework I had this week, the best animal to have as a pet, etc)
THE DETAILED VERSION
STEP 1: Line Up Time!
Ask the class to line up in two equal lines with students facing each other. *If there is an uneven number, the group at the end can work in 3 or you can participate too! (Usually I prefer to walk around and make sure that everyone is on task and speaking in Italian)
STEP 2: The Convos
In this second part, I announce the topic to the students and tell them that they have 90 seconds to talk and they have to keep going until it’s over!
**I emphasize the fact that it’s okay if they don’t know every word, the important thing is to try and carry on the conversation despite that and use the strategies that we have practiced in class to work around this.
After the 90 seconds is over, ask the class to shift down 2-3 places so that everyone has a new partner. Give them a new topic, and start the timer!
Repeat as many times as you like!
STEP 3: The Breakdown
After I have done 5-6 rounds of the game, I get the students to return to their seats and I ask what they learned from others in the class or any interesting conversation points that were shared.
We also talk about words that they had to work around and strategies that they used. This is a great chance to review communication strategies and to add some new vocabulary / phrases to the mix in a more informal way!
**If I have heard a particularly useful word or phrase (or common error!) that I think would benefit the whole class, I write it on the board and make sure to address it.
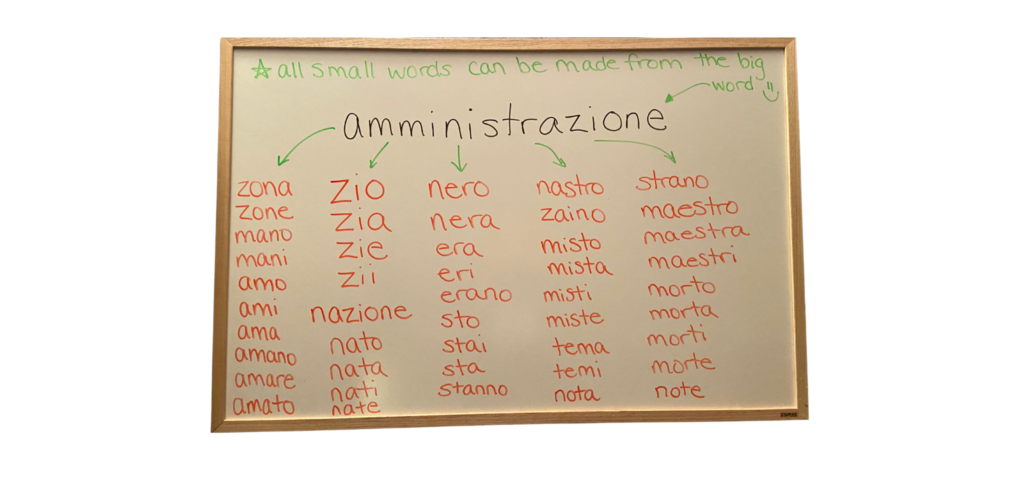
WARM-UP #7: BIG WORD, LITTLE WORDS
LENGTH: 10 minutes
OVERVIEW: Students work in groups to find as many small words as they can within a larger word that is written on the board.
GRAMMAR: None needed!
THE DETAILED VERSION
STEP 1: The Big Word
Choose a long Italian word (or it can be two words together if you like) and write it all in capital letters on the board.
*It doesn’t matter if the long word is one that they already know, it just needs to have a lot of common letters that they can use to make other words!
Some good words / combos are:
- amministrazione
- incredibilmente
- complicazione
- pallacanestro
- passeggiare
- internazionale
- macchina fotografica
STEP 2: The Game
After you write the word on the board, divide the students into small groups and tell them that they will have 2-3 minutes to find as many small words as they can within the big words.
*They can rearrange the letters as much as they want, but they can’t use the same letter twice (unless of course it is already there twice in the word).
At the end of the 2-3 minutes, see how many words each team has come up with!
I like to do 3 rounds of this and then add up the total score of each team at the end so we have a “final tally”, also creating a little more drama for the final round 🙂
WARM UP #8
FORTUNATAMENTE, SFORTUNATAMENTE
LENGTH: 5-10 minutes
OVERVIEW: Students work in groups to make a complete story using sentences that start with either “fortunatamente” or “sfortunatamente”.
GRAMMAR: I do this with either the present tense (and the story is read as if it is happening in the moment), or with the passato prossimo/ imperfetto (and the students have to write a story from the past).
THE DETAILED VERSION
STEP 1: A New Beginning
Brainstorm an interesting beginning to a story with your students and write the situation on the board. My students have loved coming up with weird scenarios even without knowing the next part of the activity!
I usually give them two options of story starters at this point and the person who writes the first sentence can choose.
STEP 2: Story Writing
In this next part, I tell students that they are going to write a story about what happens next! They can choose either of the story starters and continue from there.
The important parts are: 1) that they must alternate starting their sentences with “fortunatamente” and “sfortunatamente” and 2) the student writing the sentence should only be able to see the sentence immediately before their own, not the whole story (Example: Student #4 can see sentence #3 but not sentences #1 and #2).
After a student has finished writing his/her sentence, they fold the paper down so that only the sentence they just wrote is showing.
In small groups of approximately 5-6 students, they make their stories and at the end, each group gets a turn to share what they have written!
I love this part because it’s so interesting to see the different directions that the stories take from the same starting point!
WARM UP #9: VOCABULARY FACE-OFF
LENGTH: 10-15 minutes
OVERVIEW: Students line up in two teams facing each other (only the front two students are looking at each other, everyone else is lined up behind them waiting for their turns). The two students at the front “face off” to see who can say the most words related to the topic without pausing. The winner stays at the front until they lose to a member of the opposing team. The loser goes to the back of the line (or off to the side) until the next round. The goal is to see which team is left standing!
GRAMMAR: No specific grammar necessary – just choose topics that students can easily come up with words for!
THE DETAILED VERSION
STEP 1: Line ’em Up!
Divide students into two equal lines and arrange them so that two students are facing each other and the others behind them.
STEP 2: Game Explanation
Explain to the students that they are having a “vocabulary face-off” with the other team. The goal is to be the team that still has members left.
Once the first two students are facing each other, tell them that they will alternate saying words related to the category until someone pauses for too long. At that point, the person who paused will go to the back of the line (or off to the side) until the next round.
You can choose how long you want to continue with a certain category. (If not many words have been used, I will keep the same one for a few different students and switch it up once it seems like they are starting to have trouble.)
Some good categories are:
- school subjects
- animals at the zoo
- things in the kitchen
- places in the city
- sports
- modes of transportation
- feelings / emotions
- verbs that end in -are (or -ire / -ere)
(You can make these harder if your students are more advanced!)
Continue going until one of the teams is out of players and you have a victor!
WARM UP #10: AN INTERESTING FACT
LENGTH: 15 minutes
OVERVIEW: Students each write one interesting fact that no one knows about themselves on a small piece of paper and put it into a pile. Students are divided into four different groups (or more if your class is large) and work together to guess who wrote the interesting facts from the other groups. The group with the most correct answers wins!
GRAMMAR: Nothing in particular, though you can tailor this to your lesson. If you are working on past events, ask students to write an interesting past experience. If you are doing the present tense, ask students to write a fact about themselves, an activity that they enjoy, something they are afraid of, etc.
THE DETAILED VERSION
STEP 1: The Written Portion
Divide your class into groups of 5 (or 4 if you have a small class). This makes the guessing so much easier and it takes a lot less time!
Students each write one sentence about themselves (ideally something that people would not easily guess!) and put it into a pile. **Students from each group keep their pieces of paper in the same pile. Don’t mix the whole class into one.
STEP 2: The Guessing Portion
After you have the 5 (or 4) separate piles of student responses, give the piles to other groups in the class. The groups will work together to decide who they think wrote each of the sentences. Make sure that they know which group the answers came from!
Usually I get the students to write who they think the answer is from directly on the papers so that they don’t forget and it’s easy to read at the end.
STEP 3: The Finale
When groups have finished writing who they think the answers are from, groups take turns to read the sentences they were given and their guesses as to who wrote them.
They get to find out how many they got right and I write the number on the board.
I go through each of the 5 groups and the one with the highest number of correct answers wins! 😀
This is a really fun way to learn more about your class and get students communicating with and about each other in a positive way!
I hope this post has given you some ideas of fun Italian class activities that you could incorporate into your classroom warm-up routine.
I would love to hear comments or other suggestions that you have for awesome warm-up activities!
Looking for more fun Italian class activities? Check out this post on 10 Awesome Italian Song Activities!

